
Unleash Your Creativity with Aesthetic Clay Ideas
Aesthetic clay ideas offer a wonderful way to combine creativity and functionality. Whether you’re a seasoned potter or a beginner, there’s something incredibly satisfying about shaping that perfect piece of pottery. Here are some quick ideas to get you inspired:
- Stoneware Clay Bowls: Perfect for everyday use or as decorative pieces.
- Coffee Cups or Mugs: Create a custom mug that adds a personal touch to your morning routine.
- Heart Trinket Tray: A cute option for holding jewelry or small items.
- Incense Holders: Ideal for meditation spaces.
- Ghost Figurines: Fun and festive for Halloween.
Engaging in pottery aesthetic crafts allows you to express yourself and create beautiful, one-of-a-kind pieces. From DIY clay crafts like chunky rings to elegant trinket trays, the possibilities are endless. The best part? You don’t need a lot of fancy equipment to get started—just a little bit of clay and a big imagination.

10 Best Aesthetic Clay Ideas
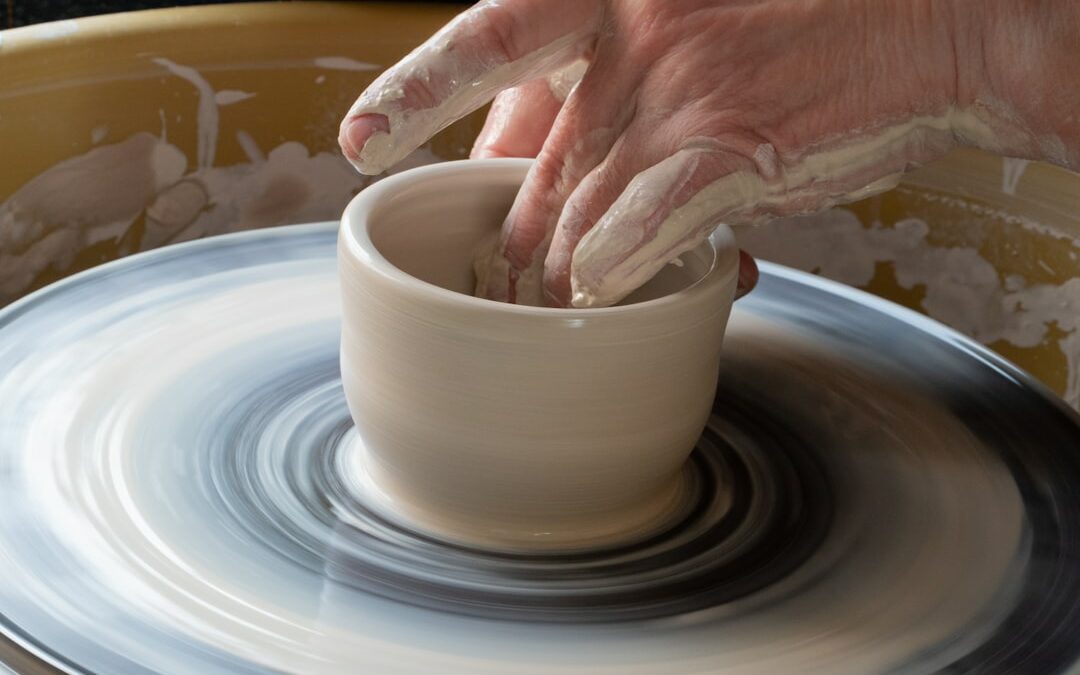
1. Stoneware Clay Bowls
Stoneware clay bowls are a classic and versatile project. Learn from experts like Anne Goodrich Hunter on Skillshare to create your own elegant bowls. These bowls are not only functional but also add a touch of handmade charm to your kitchen.
2. Coffee Cups or Mugs
Crafting your own coffee cups or mugs is a fun and practical project. Pottery and ceramic dishes like these make wonderful gifts and can be customized with unique designs. Plus, there’s something special about sipping coffee from a cup you made yourself.
3. Caterpillar Sculptures
Create whimsical caterpillar sculptures that are perfect for decorating your garden or home. These figurines can be as simple or detailed as you like, making them a great project for all skill levels.
4. Silver Clay Jewelry
For those interested in jewelry, silver clay is a fantastic medium. Sculpt delicate earrings or intricate pendants that are both beautiful and personal. This project combines the elegance of silver with the creativity of clay sculpting.
5. Upcycled Pots
Eco-friendly and stylish, upcycled pots are a great way to use recycled materials. Transform old containers into beautiful plant pots with a touch of clay. This project is perfect for those who love gardening and sustainability.
6. Heart Trinket Tray
A heart-shaped trinket tray is a sweet and practical item for holding jewelry or small keepsakes. These trays are easy to make and can be personalized with different colors and textures.
7. Ghost Figurines
Perfect for Halloween or gothic-themed décor, ghost figurines are both spooky and cute. These can be crafted simply with white clay and a few details, making them a fun project for the whole family.
8. Incense Holders
Create aesthetic incense holders that are ideal for meditation and spiritual spaces. These holders can be designed in various shapes and styles, from minimalist to elaborate.
9. Funky Jewelry
Chunky rings and evil eye rings are trendy and fun to make. These bold pieces of jewelry can be crafted with colorful clay and unique designs, adding a playful touch to any outfit.
10. Nature Imprints
Capture the beauty of nature with clay imprints of leaves and flowers. This project is simple yet stunning, perfect for creating decorative tiles or wall art. It’s also a great way to bring a bit of the outdoors inside.
Engaging in these aesthetic clay ideas not only allows you to express your creativity but also results in beautiful, unique pieces. Whether you’re making a cozy coffee mug or a whimsical ghost figurine, the joy of crafting with clay is endless.
1. Stoneware Clay Bowls
Stoneware clay bowls are a classic and versatile project for both beginners and seasoned potters. If you’re looking to dive into this craft, a great resource is the Skillshare class by Anne Goodrich Hunter.
Why Stoneware Clay Bowls?
Stoneware clay is durable and has a pleasing, earthy texture. Bowls made from this material are not only functional but also aesthetically pleasing. They can be used for everyday dining or as decorative pieces.
Anne Goodrich Hunter’s Skillshare Class
Anne Goodrich Hunter is a well-known potter and instructor. Her Skillshare class focuses on teaching the basics of making stoneware clay bowls. The class covers everything from choosing the right type of clay to glazing and firing your finished piece.
What You’ll Learn:
– Clay Preparation: How to properly wedge and prepare your clay.
– Shaping Techniques: Tips on how to shape your clay into a bowl using both hand-building and wheel-throwing methods.
– Glazing and Firing: Step-by-step instructions on how to glaze your bowl and the firing process.
Why Take This Class?
Anne’s class is perfect for beginners because it breaks down complex techniques into simple, easy-to-follow steps. Plus, the community aspect of Skillshare allows you to share your progress and get feedback from other learners.
Student Reviews:
– “Anne’s class made the process so approachable. My first bowl turned out great!”
– “I loved the hands-on approach and the detailed instructions.”
Final Thoughts
Creating stoneware clay bowls is a fulfilling and practical craft. With the right guidance from experts like Anne Goodrich Hunter, you’ll be able to create beautiful, functional pieces that you can use and cherish for years to come.
Next, we’ll explore the joy of making Coffee Cups or Mugs.
2. Coffee Cups or Mugs
Making your own coffee cups or mugs is a great way to blend creativity and practicality. Pottery not only allows you to make beautiful ceramic dishes but also gives you a sense of accomplishment every time you use them.
Pottery Classes: Many pottery studios offer beginner-friendly classes where you can learn to make your own mugs. For example, Smashed Clay in Houston offers sessions where you can create functional pottery projects like cups and vases. These classes are perfect for a fun night out or a creative date night.
Materials and Tools: You’ll need some basic tools like a pottery wheel, clay, and shaping tools. If you’re just starting out, many studios provide these materials as part of the class fee. Once you’ve shaped your mug, it needs to dry, be fired in a kiln, and then glazed. This process can take a few days to weeks, depending on the studio’s schedule.
Design Ideas: The design possibilities are endless. You can go for a simple, classic look or get creative with shapes and colors. Pinterest boards like Madison’s Aesthetic Clay Ideas offer tons of inspiration, from minimalist designs to more intricate patterns.
Case Study: At 3rd Coast Clay Studio, you can try a two-hour wheel-throwing session to make your first mug. They offer eight-week programs for those who want to dive deeper into the craft. This studio is run by local artists and provides a supportive environment for learning.
Quotes from Participants:
– “Making my own coffee mug was so rewarding. I use it every morning and it makes my coffee taste better!”
– “The process was easier than I thought, and the instructors were very helpful.”
Creating your own coffee cups or mugs is a fantastic way to personalize your morning routine while learning a new skill. It’s a fun, hands-on activity that’s perfect for all ages and skill levels.
Next, we’ll dive into the whimsical world of Caterpillar Sculptures.
3. Caterpillar Sculptures
Creating caterpillar sculptures is a delightful way to bring a touch of whimsy into your home. These playful figurines can add charm to any space and are fun to make.
Helen Burgess, a ceramicist from Sussex, England, is known for her quirky animal sculptures. Her company, nosey mungo, features a variety of animal characters, including some that look straight out of a children’s book. Her grumpy, bloated frog and hilarious blobfish are examples of how clay can bring creatures to life with personality and humor.
Materials Needed:
- Air dry clay or polymer clay
- Sculpting tools
- Paints and brushes
- Sealant (optional)
Steps to Create a Caterpillar Sculpture:
-
Form the Body: Roll the clay into a series of small balls. Connect them in a line to form the caterpillar’s body.
-
Add Details: Use sculpting tools to create texture and define segments. Add tiny legs and antennae for more character.
-
Paint: Once the clay is dry, paint your caterpillar in bright, cheerful colors. You can even add patterns like stripes or dots.
-
Seal: Apply a sealant to protect your sculpture and give it a glossy finish.
Tips for Success:
- Experiment with Sizes: Make caterpillars of different sizes to create a family of figurines.
- Use Reference Images: Look at real caterpillars or cartoon images for inspiration.
- Add Accessories: Place your caterpillar sculpture on a leaf or add tiny flowers for a complete scene.
Helen Burgess discovered clay when she needed a new focus due to fibromyalgia. Her playful, handcrafted creatures show that with a bit of creativity, you can turn simple clay into delightful characters.
Making caterpillar sculptures is a fun and easy project that allows you to explore your creativity and bring a bit of nature indoors. Whether you’re a beginner or an experienced artist, these whimsical figurines are sure to brighten your day.
Next, we’ll explore the elegant world of Silver Clay Jewelry.
4. Silver Clay Jewelry
Silver clay jewelry is a beautiful and elegant way to express your creativity. This type of clay is made from tiny particles of silver mixed with a binder. When fired, the binder burns away, leaving behind pure silver.
Sculpted earrings are a popular project for silver clay. You can create intricate designs that reflect your personal style. Whether you prefer simple studs or elaborate dangles, silver clay allows for detailed work that shines.
Jewelry made from silver clay isn’t just pretty; it’s also durable. Once fired, it has the same properties as traditional silver. This means your pieces will last a long time and can be polished to a high shine.
Why Silver Clay Jewelry?
- Versatility: You can shape it, carve it, and even add textures.
- Ease of Use: It’s perfect for beginners because it’s easy to mold.
- Professional Finish: The final product looks like fine jewelry.
Getting Started
- Gather Supplies: You’ll need silver clay, a firing method (like a kiln or torch), and basic tools like rollers and cutters.
- Design Your Piece: Sketch out your design before you start.
- Shape and Texture: Use tools to add details and textures to your clay.
- Dry and Fire: Let your piece dry completely before firing it to turn it into solid silver.
- Polish and Finish: After firing, polish your jewelry to bring out the shine.
Inspiration
- Etsy: Check out unique designs like bloody Ghostface scream jewelry holders for a mix of spooky and chic.
- Pinterest: Explore boards dedicated to chunky rings and evil eye rings for more ideas.
Silver clay jewelry is a fantastic way to create personalized, high-quality pieces that you can wear or gift. It combines the joy of crafting with the elegance of fine jewelry, making it a perfect project for anyone looking to add a bit of sparkle to their day.
Next, let’s dive into Upcycled Pots and discover how to turn recycled materials into beautiful clay creations.
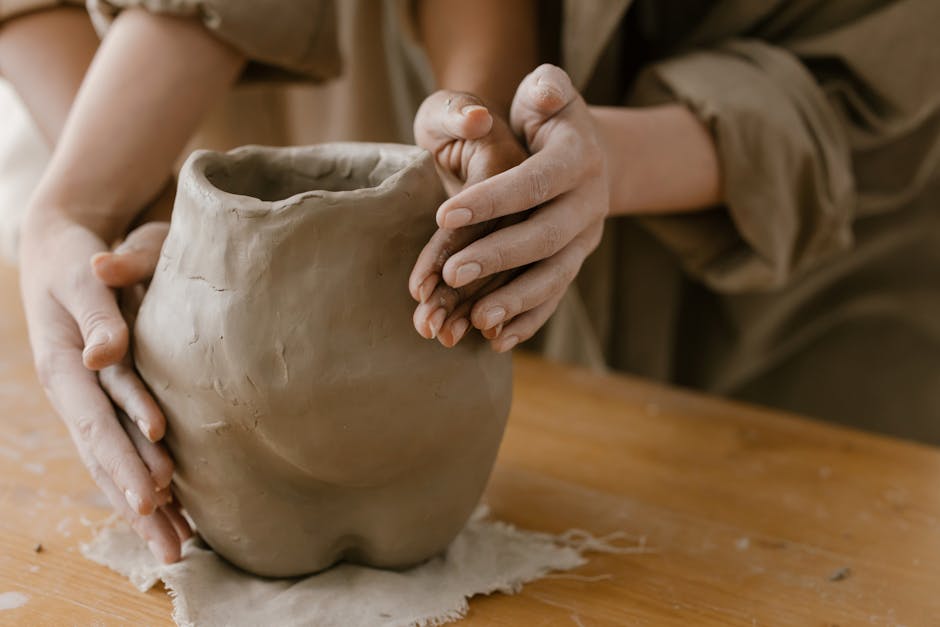
5. Upcycled Pots
Creating upcycled pots is a fantastic way to combine your love for pottery with eco-friendly practices. By using recycled materials, you can craft unique and sustainable pots that not only look great but also help reduce waste.
Why Upcycled Pots?
Eco-friendly projects are all the rage, and for good reason. Upcycling is a creative way to give new life to discarded items. It’s a win-win: you get to make beautiful pottery while also helping the environment.
Instead of buying new clay, consider using scraps from previous projects or even broken pottery pieces. These materials can be reworked into stunning new pots.
Materials You Can Use
- Broken Pottery: Smash old, broken pots into smaller pieces and incorporate them into new designs.
- Scrap Clay: Use leftover clay pieces to mold into new shapes.
- Glass Bottles: Embed small pieces of colored glass into the clay for a unique, shimmering effect.
- Metal Cans: Flatten and shape metal cans to use as molds or decorative elements.
How to Make Upcycled Pots
- Gather Materials: Collect recycled materials you want to use.
- Prepare the Clay: Mix scrap clay with water to make it pliable.
- Incorporate Recycled Items: Add broken pottery pieces or glass into the clay.
- Shape Your Pot: Mold the clay into your desired pot shape.
- Dry and Fire: Let the pot dry completely before firing it in a kiln.
Inspiration and Ideas
- Pinterest: Check out boards dedicated to upcycled pots for creative ideas.
- YouTube: Watch tutorials on creating eco-friendly pots using recycled materials.
Creating upcycled pots not only gives you a sense of accomplishment but also contributes to a more sustainable lifestyle. It’s a fun and meaningful way to enhance your pottery skills while caring for the planet.
Next, let’s explore the charm of Heart Trinket Trays and how they can add a touch of love to your daily routine.
6. Heart Trinket Tray
Heart trinket trays are a delightful way to keep your jewelry organized while adding a touch of charm to your space. These heart-shaped trays are perfect for holding rings, earrings, and other small items. Here’s how you can make your own.
Materials You’ll Need
- Air dry clay: This is easy to work with and doesn’t require a kiln.
- Rolling pin: To flatten the clay.
- Heart-shaped cookie cutter: For cutting out the tray shape.
- Clay tools: For smoothing and detailing.
- Paints and brushes: To decorate your tray.
Step-by-Step Guide
- Roll out the clay: Use your rolling pin to flatten the clay to about ¼ inch thickness.
- Cut the shape: Press the heart-shaped cookie cutter into the clay to create your tray base.
- Form the edges: Gently lift the edges of the heart shape to form a shallow tray.
- Smooth and detail: Use clay tools to smooth out any rough edges and add any desired details.
- Dry: Let the tray air dry completely, which may take 24-48 hours.
- Paint and seal: Once dry, paint your tray in your favorite colors and seal with a clear varnish to protect it.
Inspiration and Ideas
- Pinterest: Explore boards like Pottery Aesthetic for more heart-shaped tray ideas.
- Etsy: Check out Heart Trinket Trays for unique designs and inspiration.
Benefits of Making Heart Trinket Trays
- Personalized Gifts: These trays make thoughtful, handmade gifts for friends and family.
- Home Decor: Adds a cute and functional element to your vanity or dresser.
- Creative Outlet: A great way to express creativity and unwind.
Creating a heart trinket tray is a simple yet satisfying project that adds a personal touch to your jewelry storage. Next, we’ll explore the whimsical world of Ghost Figurines perfect for Halloween decor.
7. Ghost Figurines
Ghost figurines are a fun and spooky way to add a touch of Halloween magic to your home. These aesthetic clay ideas are perfect for those who love gothic and eerie decor.
Why Ghost Figurines?
Halloween Decor: Ghost figurines are a staple for Halloween. They can be placed around your home to create a spooky atmosphere. Whether you prefer cute or creepy, clay allows you to customize your figurines to match your style.
Gothic Appeal: For those who enjoy gothic themes, ghost figurines can be a year-round addition. They add a mysterious and dark element to any room, blending well with black, deep reds, and other dark colors.
How to Make Ghost Figurines
Materials Needed:
– Air dry clay
– Sculpting tools
– White paint
– Black paint (for eyes and mouth)
– Fine brush
Steps:
1. Shape the Body: Start by forming a small ball of clay. Flatten one side to create the base and gently stretch the top to form the ghost’s head.
2. Add Details: Use sculpting tools to create folds and texture, giving the ghost a flowing appearance.
3. Paint: Once the clay is dry, paint the ghost white. Add black eyes and a mouth using a fine brush.
4. Finishing Touches: Optionally, you can add a bit of glitter or glow-in-the-dark paint for a spooky effect.
Inspiration from the Community
Pinterest is a great source for ghost figurine ideas. You can find everything from cute, smiling ghosts to more detailed and intricate designs.
Etsy also offers a variety of handmade ghost figurines that can inspire your creations. Check out unique designs like the Bloody Ghostface Scream Jewelry Holder for a mix of functionality and spooky charm.
Creating ghost figurines is a delightful way to get into the Halloween spirit and explore your gothic side. Next up, we’ll dive into the calming world of Incense Holders perfect for meditation and spiritual practices.
8. Incense Holders
Incense holders are not just practical; they can also be beautiful pieces of art that add a spiritual touch to your space. Whether you’re into meditation or just love the calming scent of incense, creating your own incense holders can be a rewarding project.
Meditation Gifts
Handmade incense holders make thoughtful meditation gifts. They are perfect for friends or family members who practice mindfulness or yoga. A unique incense holder can help create a serene atmosphere, making meditation sessions even more peaceful.
One popular idea is the Uterus Ceramic Incense Holder. It’s both a feminist statement and a beautiful piece of art. You can find similar designs on platforms like Etsy, which offer a variety of handmade options.
Spiritual
Incense holders also have a strong spiritual element. They are often used in rituals and spiritual practices to cleanse the space and promote positive energy.
For a more personalized touch, consider making an incense holder with air-dry clay. This project is beginner-friendly and allows for endless customization. You can shape the clay into various forms, such as leaves, flowers, or abstract designs.
Pinterest is a great place to find inspiration. Check out boards like Aesthetic Clay Ideas for creative designs that can spark your imagination.
Creating your own incense holder is not just a craft; it’s a way to infuse your space with calm and positive vibes. Whether you’re making it for yourself or as a gift, it’s a project that’s both fun and meaningful.
Next, let’s explore Funky Jewelry and how you can create unique, eye-catching pieces with clay.
9. Funky Jewelry
Creating funky jewelry with clay is a fantastic way to express your unique style. Let’s dive into two popular trends: chunky rings and evil eye rings.
Chunky Rings
Chunky rings are bold and playful. They can be made in various colors and shapes, making them perfect for adding a pop of color to any outfit.
How to Make Chunky Rings:
- Choose Your Clay: Opt for colorful polymer clay, which is easy to mold and bake.
- Shape Your Rings: Roll out the clay and shape it into thick bands. Get creative with textures and patterns!
- Bake and Cool: Follow the clay package instructions for baking. Once baked, let the rings cool completely.
- Finish: Sand any rough edges and add a glossy finish if desired.
Inspiration: Check out Pinterest for some vibrant and chunky ring ideas that can spark your creativity.
Evil Eye Rings
Evil eye rings are not just stylish; they are believed to protect against negative energy. These rings can be both fashionable and meaningful.
How to Make Evil Eye Rings:
- Select Your Clay: Use white and blue polymer clay for the traditional evil eye look.
- Form the Base: Create a ring base similar to the chunky ring method.
- Add the Eye: Roll small pieces of blue and white clay to form the eye and attach it to the ring.
- Bake and Cool: Bake according to the clay instructions and let cool.
- Detailing: Paint on any additional details and add a protective clear coat if desired.
Inspiration: For more ideas, check out Depop where you can see trendy evil eye ring designs.
Creating your own funky jewelry with clay is a fun and rewarding experience. Not only do you get to wear your creations, but you can also gift them to friends and family. Plus, it’s a great way to spend a creative afternoon!
Next, let’s look at how you can use nature imprints to create beautiful and natural-looking clay pieces.
10. Nature Imprints
Nature imprints are a fantastic way to bring the outdoors inside and add a touch of natural beauty to your clay creations. This technique involves pressing or other natural elements into clay to create stunning, detailed impressions.
Materials Needed
- Air dry clay or polymer clay
- Leaves or flowers (fresh or dried)
- Rolling pin
- Craft knife
- Paints (optional)
- Clear varnish (optional)
Steps to Create Nature Imprints
-
Roll Out the Clay: Start by rolling out your clay to your desired thickness. A 1/4 inch thickness is usually ideal.
-
Select Your Natural Elements: Choose leaves or flowers with interesting textures and patterns. Ferns, maple leaves, and daisies are popular choices.
-
Press into the Clay: Gently press the leaf or flower into the clay. Use a rolling pin to ensure even pressure and a clear imprint.
-
Remove Carefully: Slowly peel away the leaf or flower to reveal the imprint. The details should be clearly visible in the clay.
-
Shape and Cut: Use a craft knife to cut the clay into your desired shape. You can make coasters, ornaments, or even wall art.
-
Dry and Paint: Allow the clay to dry completely. Once dry, you can paint the imprints to highlight the details. Use earthy tones for a natural look or bright colors for a more vibrant piece.
-
Seal with Varnish: To protect your creation, apply a clear varnish. This step is optional but recommended for items that will be handled frequently.
Inspiration
For more ideas, check out Pinterest where you can find a variety of aesthetic clay ideas including nature imprints.
Tips
- Experiment with Different Plants: Different leaves and flowers will give you different textures and patterns. Feel free to experiment and find what works best for you.
- Use Seasonal Elements: Capture the essence of each season by using seasonal plants. Spring flowers, summer leaves, autumn foliage, and winter evergreens each offer unique beauty.
- Combine Techniques: Combine nature imprints with other clay techniques, like painting or glazing, to create multi-dimensional pieces.
Nature imprints are a simple yet effective way to create beautiful, nature-inspired clay art. They are perfect for beginners and experienced crafters alike. Plus, they make fantastic gifts and home decor pieces.
Next, let’s explore how to make cute things with air dry clay, perfect for spring projects and Easter crafts.
How to Make Cute Things with Air Dry Clay
Air dry clay is perfect for cute, easy, and fun projects. It’s simple to use and doesn’t need a kiln. Here are some spring projects and Easter crafts to brighten your day.
Spring Projects
1. Flower Imprints
Create beautiful flower imprints by pressing fresh blossoms into the clay. Paint the imprints with soft pastel colors for a springtime feel.
2. Butterfly Magnets
Use cookie cutters to shape butterflies. Add magnets to the back once they dry. These make great fridge decorations.
3. Leaf Bowls
Press leaves into rolled-out clay to create textured bowls. Once dry, paint them in green and gold for a natural look.
Easter Crafts
1. Bunny Figurines
Sculpt cute bunnies with simple shapes. Paint them in soft colors like white, pink, and light blue. These make adorable Easter decor.
2. Egg Ornaments
Roll the clay into egg shapes and decorate with patterns. Add a small hole at the top before drying so you can hang them with ribbons.
3. Chick Planters
Shape small planters in the form of chicks. Once they dry, paint them yellow and add tiny eyes and beaks. Perfect for small succulents.
YouTube Tutorial
For visual learners, there are many great tutorials available online. Check out this YouTube tutorial for step-by-step instructions on making various air dry clay crafts. This video covers basic techniques and offers creative ideas to get you started.
Air dry clay is versatile and easy to work with, making it ideal for all sorts of cute and aesthetic projects. Whether you’re making gifts or just having fun, these ideas will inspire you to create something beautiful.
Next, we’ll look at simple aesthetic clay ideas perfect for beginners.
Simple Aesthetic Clay Ideas for Beginners
If you’re new to working with clay, don’t worry! There are plenty of easy projects that are perfect for beginners. These beginner-friendly ideas will help you get started and create something beautiful without feeling overwhelmed.
Easy Projects to Try
-
Heart Trinket Tray
A heart-shaped trinket tray is simple to make and super cute. It’s perfect for holding jewelry or small items. You can find inspiration and step-by-step guides on Pinterest. -
Ghost Figurines
Perfect for Halloween or any time you want to add a spooky touch to your decor. These little ghost figurines are easy to shape and can be painted for extra personality. -
Incense Holders
Create your own incense holders using air dry clay. These can be simple or intricate, depending on your skill level. Check out some unique designs on Pinterest. -
Nature Imprints
Use leaves and flowers to make beautiful imprints in your clay. This project is not only easy but also brings a touch of nature into your home. It’s a great project for kids too.
Beginner-Friendly Tips
- Start Small: Begin with small projects like jewelry trays or simple figurines. This will help you get comfortable with the material.
- Use Tools You Have: You don’t need special tools to start. Household items like rolling pins, cookie cutters, and toothpicks work great.
- Follow Tutorials: There are many online tutorials to guide you step-by-step. For example, check out this YouTube tutorial for making cute air dry clay crafts.
Pinterest Inspiration
Pinterest is a goldmine for aesthetic clay ideas. Here are some boards to get you inspired:
- Aesthetic Clay Ideas
- Pottery Aesthetic
These boards are filled with creative and beautiful projects that are perfect for beginners. From simple bowls to intricate jewelry, you’ll find plenty of ideas to try.
Next, let’s answer some frequently asked questions about aesthetic clay ideas.
Frequently Asked Questions about Aesthetic Clay Ideas
What are some ideas to make with clay?
Here are some aesthetic clay ideas to get your creative juices flowing:
- Stoneware Clay Bowls: Perfect for beginners. You can find classes on Skillshare taught by experts like Anne Goodrich Hunter.
- Coffee Cups or Mugs: Create your own pottery and ceramic dishes. They make great functional art pieces.
- Caterpillar Sculptures: Fun and whimsical figurines that add a playful touch to your decor.
- Silver Clay Jewelry: Sculpted earrings and other jewelry pieces that are both beautiful and unique.
- Upcycled Pots: Use recycled materials to make eco-friendly and stylish pots.
- Heart Trinket Tray: Ideal for holding jewelry, these heart-shaped trays are both cute and practical.
- Ghost Figurines: Perfect for Halloween or gothic-themed decor.
- Incense Holders: Great for spiritual and meditation gifts.
- Funky Jewelry: Chunky rings and evil eye rings that stand out and make a statement.
- Nature Imprints: Use leaves and flowers to create beautiful imprints on your clay projects.
How to make cute things with air dry clay?
Air dry clay is versatile and easy to use. Here are some ideas:
- Spring Projects: Think flowers, butterflies, and pastel colors. Perfect for seasonal decor.
- Easter Crafts: Create bunnies, eggs, and other Easter-themed items. Check out this YouTube tutorial for step-by-step instructions.
- Nature Imprints: Press leaves and flowers into the clay to create beautiful, natural designs.
- Heart Trinket Tray: Simple to make and perfect for holding small items.
- Ghost Figurines: Easy and fun, especially for kids. Great for Halloween decorations.
- Pinch Pots: Simple bowls that are great for beginners. Just pinch the clay into shape!
- Cookie Cutter Lamp: Use cookie cutters to create shapes that can be turned into a unique lamp.
What to make with air dry clay for kids?
Kids will love these easy and fun projects:
- Nature Imprints: Collect leaves and flowers to press into the clay.
- Pinch Pots: Simple and fun to make. Perfect for beginners.
- Starfish: Easy to shape and paint. Great for ocean-themed projects.
- Heart Trinket Tray: Kids can make these for holding their small treasures.
- Ghosts: Fun and easy to mold. Perfect for Halloween.
- Fossils: Press small toys or shells into the clay to create fossil imprints.
- Clay Bracelet: Roll out thin ropes of clay and twist them together to make a bracelet.
These projects are not only fun but also help children develop their creativity and fine motor skills.
Next, let’s wrap up with some final thoughts on aesthetic clay ideas and how they can brighten your day.
Conclusion
Exploring aesthetic clay ideas can truly brighten your day. From creating heart-shaped trinket trays to molding adorable ghost figurines, the possibilities are endless. These projects not only provide a creative outlet but also result in beautiful, handmade items that can be used or gifted.
When working with clay, it’s crucial to consider the materials and tools you use, especially if you’re storing or shipping your creations. This is where Micro-Pak Distribution USA comes in. They specialize in anti-microbial and anti-moisture products that can protect your clay crafts from mold and mildew. Their innovative solutions, like Micro-Pak Dri Clay™, ensure that your handmade items remain in perfect condition, whether they are stored at home or shipped across the globe.
Micro-Pak Dri Clay™ is a 100% natural desiccant made from bentonite clay. It’s safer and more effective than traditional desiccants like silica gel. This makes it an ideal choice for protecting your clay crafts. You can learn more about Micro-Pak Dri Clay™ and how it can replace silica gel and calcium chloride desiccants here.
Incorporating these protective measures ensures that your aesthetic clay projects stay beautiful and mold-free, giving you peace of mind. So go ahead, get creative with clay, and let Micro-Pak Distribution USA help you keep your creations safe and stunning.
Recent Comments